Graduation example: case 1#
In this tutorial, the mesh is made up of cells at different levels which do not overlap and we want to yield a graded mesh at the end of the process.
The complete example can be downloaded here: graduation case 1
First, we need to construct an initial mesh with this property. We generate it randomly, starting by level \(1\) in the 2D domain \([0, 1] \times [0, 1]\). The principle is to randomly refine the cells at a given level and to create a new mesh. The creation of the initial mesh is done by the following code.
auto generate_mesh(std::size_t start_level, std::size_t max_level)
{
    constexpr std::size_t dim = 2;
    samurai::Box<int, dim> box({0, 0}, {1<<start_level, 1<<start_level});
    samurai::CellArray<dim> ca;

    ca[start_level] = {start_level, box};

    for(std::size_t ite = 0; ite < max_level - start_level; ++ite)
    {
        samurai::CellList<dim> cl;

        samurai::for_each_interval(ca, [&](std::size_t level, const auto& interval, const auto& index)
        {
            auto choice = xt::random::choice(xt::xtensor_fixed<bool, xt::xshape<2>>{true, false}, interval.size());
            for(int i = interval.start, ic = 0; i<interval.end; ++i, ++ic)
            {
                if (choice[ic])
                {
                    cl[level + 1][2*index].add_interval({2*i, 2*i+2});
                    cl[level + 1][2*index + 1].add_interval({2*i, 2*i+2});
                }
                else
                {
                    cl[level][index].add_point(i);
                }
            }
        });

        ca = cl;
    }

    return ca;
}
Let us explain this function step by step. There are two parameters: start_level is the level at which we build the initial mesh for the domain \([0, 1] \times [0, 1]\) and max_level is the maximum level at which we are allowed to have cells.
The first part is the construction of the uniform initial mesh
samurai::Box<int, dim> box({0, 0}, {1<<start_level, 1<<start_level});
samurai::CellArray<dim> ca;
ca[start_level] = {start_level, box};
Here, we construct a samurai::CellArray from a box.
In samurai, a box is defined by its minimum and its maximum coordinates.
As seen before, samurai::CellArray contains integers describing the mesh.
The relation between the space step and the level is \(\Delta x=\frac{1}{2^{\text{level}}}\).
Recalling that our domain is \([0, 1] \times [0, 1]\), then, our box starts at \([0, 0]\) and needs \(2^{\text{level}}\) points to reach the maximum coordinates \([1, 1]\).
At the end, we assign this box to the start_level of the samurai::CellArray.
Now that we have the initial mesh, we can start to refine it randomly. Let us start with the inner loop.
Here we cycle on the 1D intervals of each level of ca.
The for_each_interval function takes a samurai::CellArray and a lambda function with the parameters interval which is the interval in the x-direction and an array index with the coordinates of the other dimensions.
Since our domain is 2D, index is an array of size \(1\) and contains the y-coordinate.
Then, from the size of the interval, we construct an xtensor container with random values true or false and we loop over these values.
If the value is true, we refine the cell and we add it to a samurai::CellList (this ensures better performance during the construction of a mesh, compared to samurai::CellArray).
If the value is false, we just add this cell to the new mesh, as it is.
Our samurai::CellList contains the new mesh and we have now to assign it to samurai::CellArray.
ca = cl;
Note
The boolean in the second argument indicates that we want to update the index of the intervals in the x-direction. The index is important if you want to attach a field to the mesh. It gives the portion in the data array corresponding to a given interval.
We make this process max_level - start_level times to obtain cells on max_level at the very end.
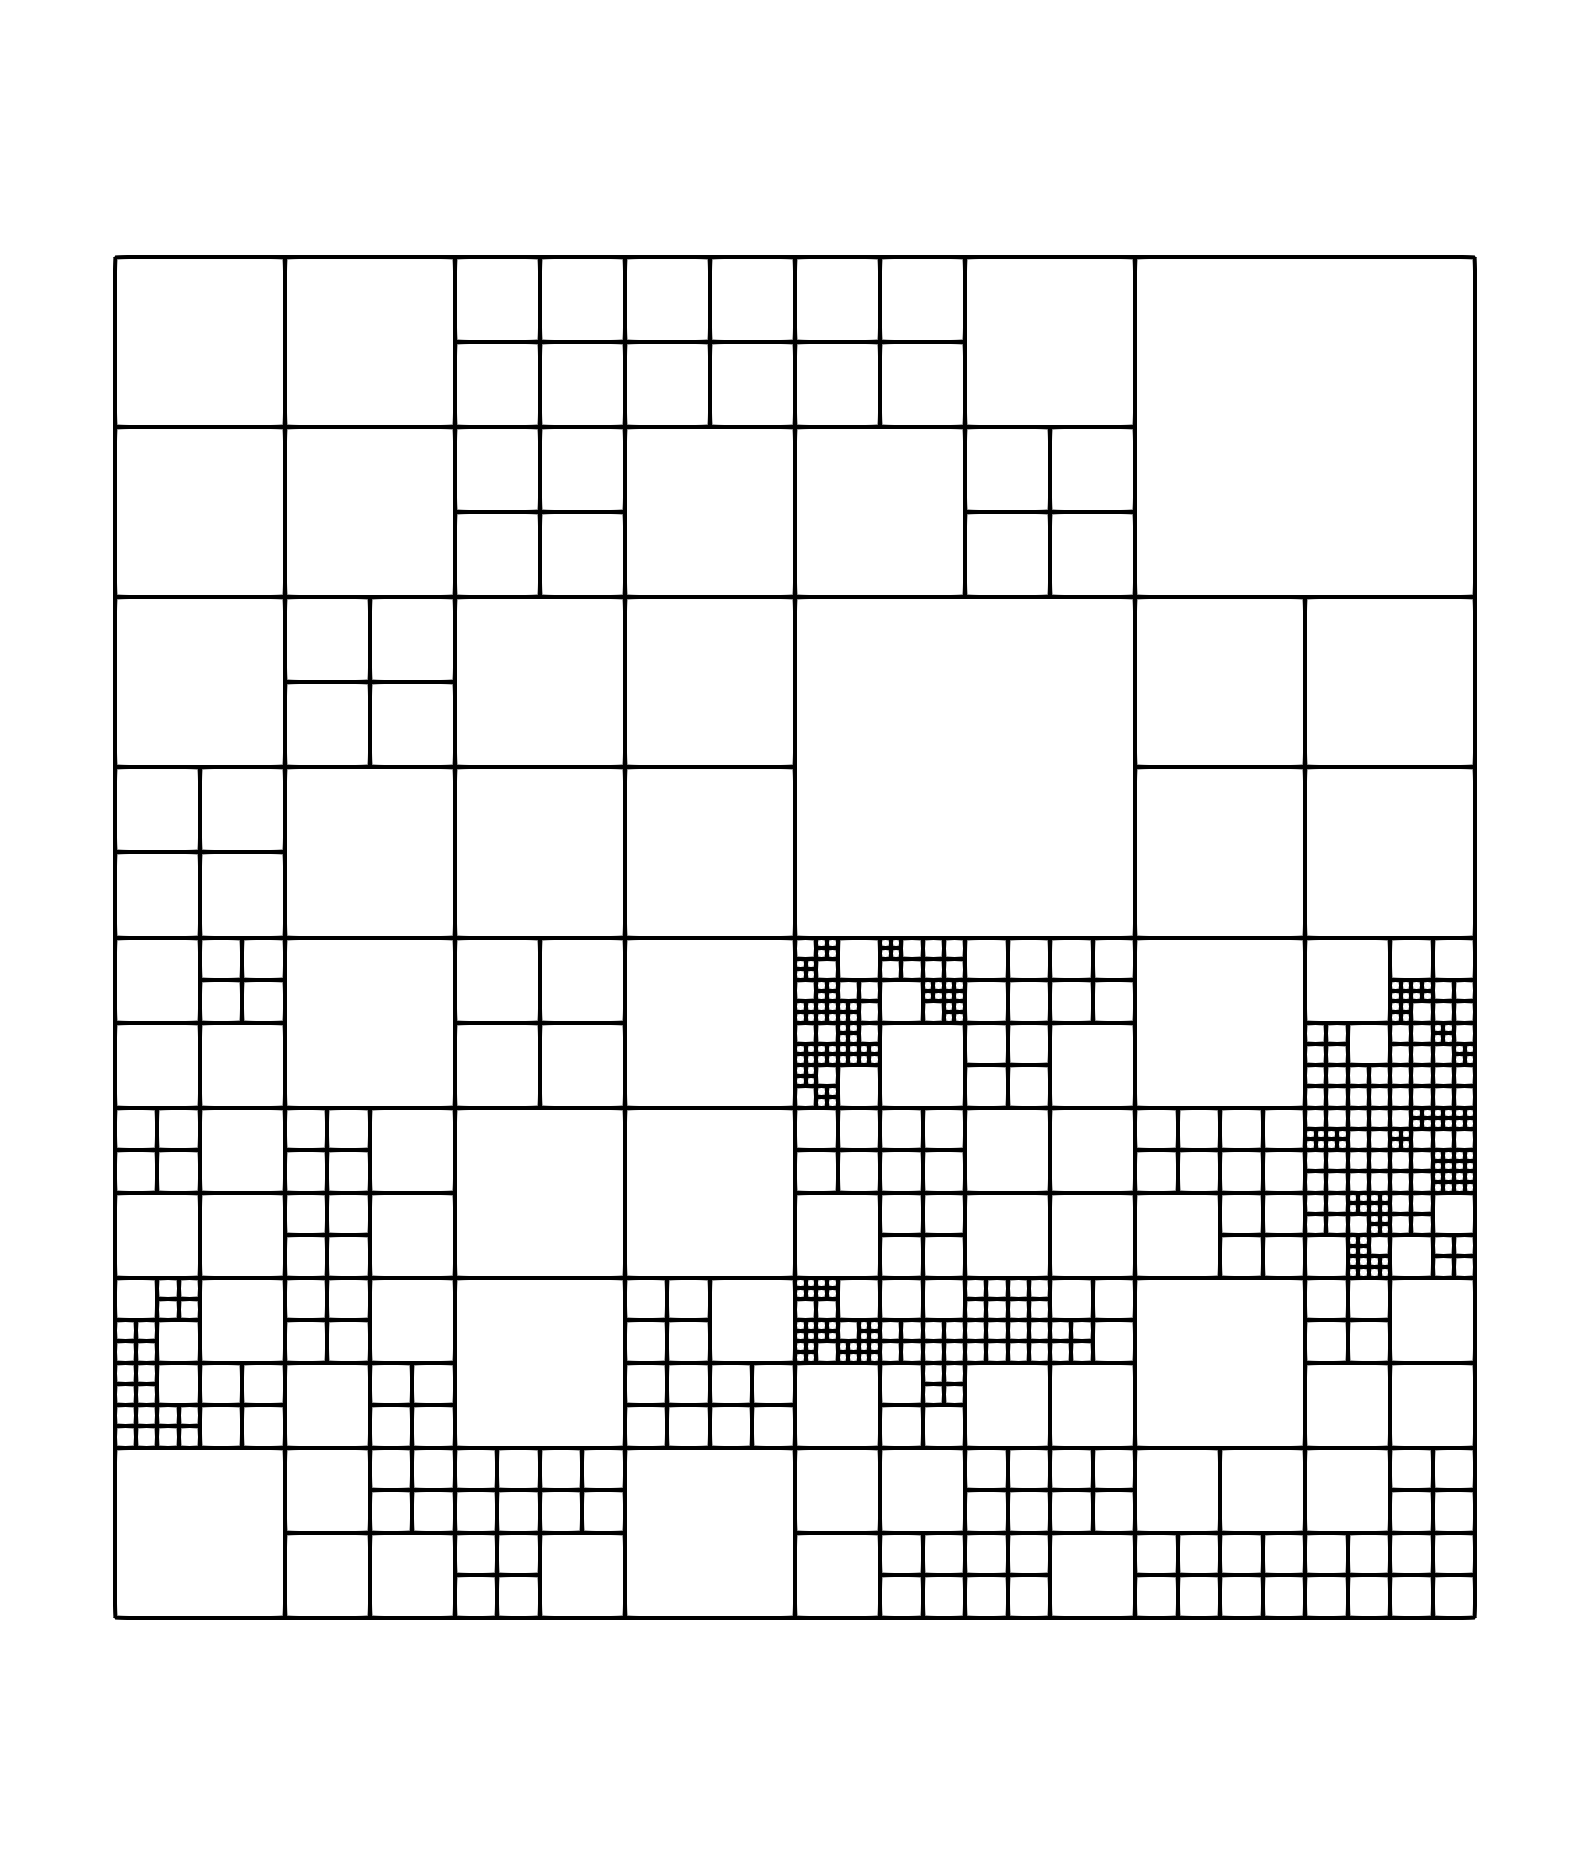
The figure below is an example of such initial mesh with start_level = 1 and max_level = 7.
Now, we want to make this mesh graded, namely that, moving towards a given direction, we cannot have jumps of more than one level. We will use the subset mechanism of samurai to graduate the mesh. The idea is the following: we take the cells of a given level \(l\), we translate them in each direction with a stencil of 1 (we could make larger graduation steps). If an intersection with a cell at the level \(L \leq l - 2\) exists, it means that the mesh is not graded and we need to refine the cell at the level \(L\).
For this algorithm, we use a field named tag associated to the mesh. This field is an array of booleans. If the value is set to true, the corresponding cell must be refined. Otherwise it is kept as it is.
auto tag = samurai::make_field<bool, 1>("tag", ca);
tag.fill(false);
We initialize all the entries of the field tag to false meaning that all the cells are to be kept.
Now we try to find an intersection as described previously using subset construction. Let us show how it is written for a given level and a level_below where level_below < level - 1.
auto set = samurai::intersection(samurai::translate(ca[level], s), ca[level_below])
          .on(level_below);

set([&](const auto& i, const auto& index)
{
    tag(level_below, i, index[0]) = true;
});
s is a vector indicating how we translate the mesh. For example, if we want to translate the mesh one cell towards the right, s shall be equal to {1, 0}. set is the subset we try to find.
Indeed, if we just write
auto set = samurai::intersection(samurai::translate(ca[level], s), ca[level_below]);
set will be calculated on the larger available level, namely level. This not what we want since we desire to tag the cell corresponding to this intersection at level level_below. This is why on(level_below) was added.
If this subset exists, we want to apply a function.
set([&](const auto& i, const auto& index)
{
    tag(level_below, i, index[0]) = true;
});
This is just a lambda function for the operator() of the subset which takes two parameters: i the interval found for this intersection and an array index of size dim - 1 = 1 with the y-coordinate. The element of any field in samurai can be accessed using field(level, i, j, k) where i is an interval and j and k are integers. This operator returns a xtensor view of the field.
We can now apply this kernel for different stencils and different levels of the mesh.
std::size_t min_level = ca.min_level();
std::size_t max_level = ca.max_level();

xt::xtensor_fixed<int, xt::xshape<4, dim>> stencil{{1, 1}, {-1, -1}, {-1, 1}, {1, -1}};

for(std::size_t level = min_level + 2; level <= max_level; ++level)
{
    for(std::size_t level_below = min_level; level_below < level - 1; ++level_below)
    {
        for(std::size_t i = 0; i < stencil.shape()[0]; ++i)
        {
            auto s = xt::view(stencil, i);

            auto set = samurai::intersection(samurai::translate(ca[level], s), ca[level_below])
                      .on(level_below);

            set([&](const auto& i, const auto& index)
            {
                tag(level_below, i, index[0]) = true;
            });
        }
    }
}
At the end of these operations, we know which cell must be refined and which cell must be kept.
We can construct the new mesh using tag field and samurai::CellList.
samurai::CellList<dim> cl;

samurai::for_each_cell(ca, [&](auto cell)
{
    auto i = cell.indices[0];
    auto j = cell.indices[1];
    if (tag[cell])
    {
        cl[cell.level + 1][{2*j}].add_interval({2*i, 2*i+2});
        cl[cell.level + 1][{2*j + 1}].add_interval({2*i, 2*i+2});
    }
    else
    {
        cl[cell.level][{j}].add_point(i);
    }
});
samurai::CellArray<dim> new_ca = cl;
The refinement is done for a cell at \(L \leq l - 2\) but imagine that L = 1 and l = 5. Then we would refine the cell at level L = 1 which will transform into four cells at level L + 1 = 2. This is not enough to have the grading of the mesh since there is still a gap of 2 levels. Therefore, we have to iterate this process until it yields a graded mesh.
The graduation procedure can be written as
std::size_t min_level = ca.min_level();
std::size_t max_level = ca.max_level();

xt::xtensor_fixed<int, xt::xshape<4, dim>> stencil{{1, 1}, {-1, -1}, {-1, 1}, {1, -1}};

while(true)
{
    auto tag = samurai::make_field<bool, 1>("tag", ca);
    tag.fill(false);

    for(std::size_t level = min_level + 2; level <= max_level; ++level)
    {
        for(std::size_t level_below = min_level; level_below < level - 1; ++level_below)
        {
            for(std::size_t i = 0; i < stencil.shape()[0]; ++i)
            {
                auto s = xt::view(stencil, i);
                auto set = samurai::intersection(samurai::translate(ca[level], s), ca[level_below]).on(level_below);
                set([&](const auto& i, const auto& index)
                {
                    tag(level_below, i, index[0]) = true;
                });
            }
        }
    }

    samurai::CellList<dim> cl;
    samurai::for_each_cell(ca, [&](auto cell)
    {
        auto i = cell.indices[0];
        auto j = cell.indices[1];
        if (tag[cell])
        {
            cl[cell.level + 1][{2*j}].add_interval({2*i, 2*i+2});
            cl[cell.level + 1][{2*j + 1}].add_interval({2*i, 2*i+2});
        }
        else
        {
            cl[cell.level][{j}].add_point(i);
        }
    });
    samurai::CellArray<dim> new_ca = cl;

    if(new_ca == ca)
    {
        break;
    }

    std::swap(ca, new_ca);
}
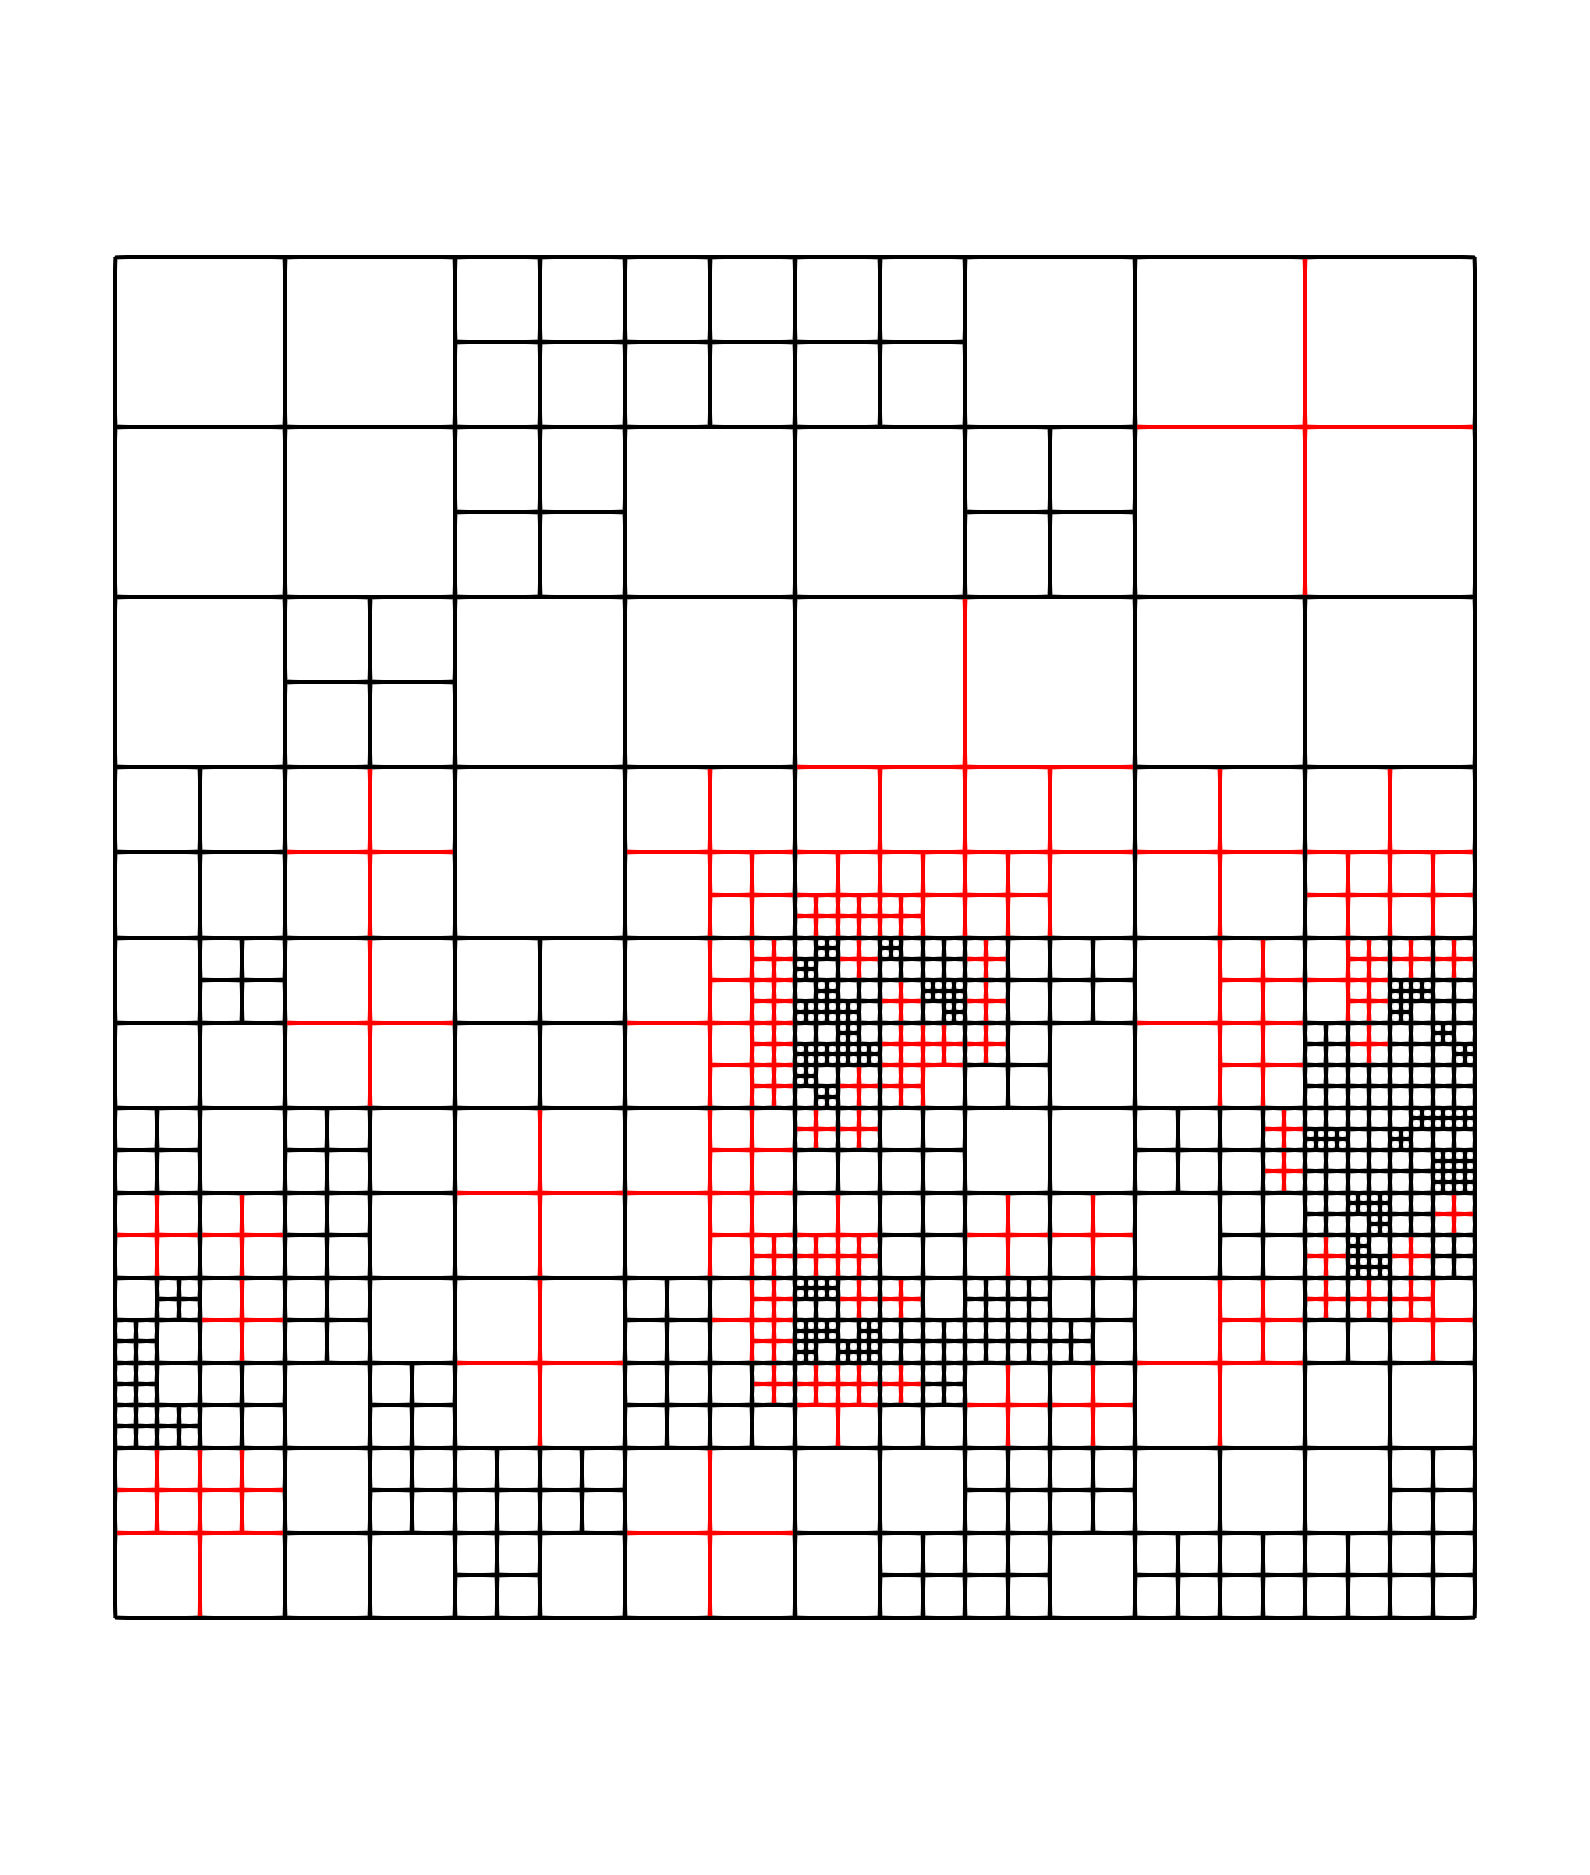
The figure below is the graded version of our initial mesh. The red cells are the cells which have been added by the graduation.
Note
If we choose to grade the mesh also along the diagonals, this can be done by considering the directions along the diagonals into the vectors of the stencils. This is
xt::xtensor_fixed<int, xt::xshape<4, dim>> stencil{{1, 1}, {-1, 1}, {-1, -1}, {1, -1}};
The reader can easily check that this indeed grants the good grading property also along the cartesian axis.